Creating beautiful documents from markdown is really easy with Remarq. Here's a quick introduction to the most useful things you should know.
You can automatically add title pages to your document by adding a few simple lines to the top of your document document.
A block of YAML configuration data at the beginning of your document should be delimited by a line of three hyphens (---) at the top and a line of three hyphens (---) at the end of the data block.
If you include 'title', 'author', and 'date' fields they will be used on the title page of the generated document.
---
title: A simple document
author: Jeremy Green
date: Jan 2015
tags: [nothing, nothingness]
notes: |
  Send to editor
language: en-US
---
A table of contents can be automatically generated for your document by checking the box for "Table of Contents" in your style setup. You can control how many levels of headings are included in the TOC by changing the "TOC Depth" setting. (This will probably move to being a document level setting very soon.)
H1 for your main section headingsIt's common to say that a document should have only a single H1 level
heading, and that's usually the title of the document. Since we have a
title page accomplishing that job (and since it's a PDF and not a real
H1 tag) it makes sense to use H1 for each of the major sections of
the document. This will produce the best results for the automatically
generated table of contents.
An H1 level header is indicated by a new line that starts with a
single #.
# This is an H1 level heading
There are two ways to create title pages for each major document section.
In your style, check the box in the "Top Level Headings (H1)" section that says "Create section title pages". Doing this will set each H1 level heading on its own page. You can alter the background and font color of that page by setting the background and font color for the H1 headings.
For more complex section title pages you can wrap content in \sectionTitle
and \stopSectionTitle tags as shown below. The font color and page
background color are controlled in the "Section Title Pages" section of your style.
\sectionTitle

# Here's a heading on a title page

And here is a paragraph of text on the title page. You can include
anything you want on the title page.

## Even second level heading

* Or a list
* Of items

\stopSectionTitle
Sub sections should be started with an H2 level heading, denoted with
2 # characters.
You can further structure your document with sub-sub section headings of
the H3 level (3 # characters).
## This is a sub section level heading

### And this is a sub-sub section heading
To emphahize some text (with italics) you should surround it with * or
_ characters.
This text is _emphasized with underscores_, and this
is *emphasized with asterisks*.
Doubling those characters will produce strong emphasis (bolded text).
This is **strong emphasis** and __with underscores__.
Surrounding text with two ~ characters will strike out that text.
This text ~~contains a strike out~~.
Block quotes are indicated by starting each line of the block with the
> character.
> Literally better than anything else in the world.
> - Kai Davis on Hobo Standard
One thing to note: lists (bulleted or ordered) that have a line of text before them need to have a line-break before the list starts. Let's take a look at how this should be formatted:
This is a line of text. **This is bold text** and _this is italic text_!

* This is a list item
* And another list item
    - This is a sub list item
    - And another sub list item
* Yet another main list item

This is some more text.
When using a list in your document, make sure that you include a linebreak separating the list from the content. Below, you'll find additional examples for using bulleted and ordered lists.
Bulleted list items should begin each line with *, + or -. Indent list items by 4 spaces to create sub lists.
* This is a list item
* And another list item
    - This is a sub list item
    - And another sub list item
* Yet another main list item
Ordered list items should begin each line with #.. This will allow
the numbers to be placed automatically based on the items position
within the list, and you don't have to worry about keeping the numbers
in order.
#. This is item 1
#. This is item 2
    #. This is item 2.1
You can create horizontal rules by placing three or more *, -, or _
characters on a single line. They may optionally be separated with
spaces.
---------------

*  *  *  *
In order to create a single line break, as opposed to a paragraph break, you can leave two blank spaces at the end of a line, then start a new line. The second line will appear directly below the first line.
This is the first line, it has two blank spaces at the end.
This is the next line, which appears directly underneath the first.
You can also use <br/> to force line breaks.
If you need to create blank space within a document you can use
along with <br/>.
Here's a line of text followed by some blank space.
<br/>
<br/>
<br/>
And here's another line, after the blank space.
If you need to force a page break you can accomplish that with the
\newpage command.
This will be on one page.

\newpage

And this will be on the next one.
Enclosing a URL or email address in pointy brackets will print the text and make it a clickable link.
<http://www.octolabs.com>
<jeremy@octolabs.com>
Inline links can be created by surrounding the text in square brackets and including the link directly afterwards in parentheses.
Please visit [my website.](http://www.octolabs.com/)
A link preceded by an exclamation point will be an image. If the image occurs by itself in a paragraph the image will be rendered as a figure, with the "link text" acting as the figure label.

By default images will "float" to allow for the optimum use of space on
the page. This means that an image may appear in the final document
somewhat later than where it appears in the source. You can force an
image to appear exactly where you put it by including a (LaTeX style) non-breaking
space after the image. A non breaking space consists of a back slash
(\) followed by a space ().
\
Please note that an image forced into position in this way will not have a figure label.
You can force an image to display at a certain size by including a width after the image location.
{width=1in}
As a general rule if you want things to appear at their "natural size" you should take the pixel dimensions of the image and divide by 96. So, for a logo that is 300px across you'd probably want to use a width of 3.125 inches. If you use a width larger than 3.125 the image would appear to be scaled up, and if you use something smaller than 3.125 the image would appear to be scaled down. You should be able to use any size you want that gets things to look the way you want it.
You can also use a percentage.
{width=50%}
To host your images in Dropbox, you need to make sure that they are in
your ~/Dropbox/Public folder. Then you can copy the public link to the
image.
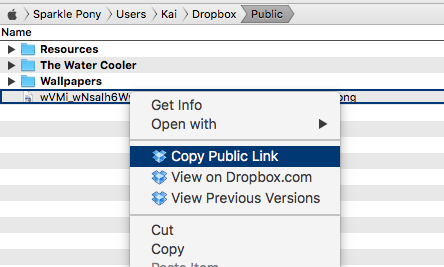
If you try to 'Copy Public Link' for an item that is not in your
~/Dropbox/Public folder you will get a URL that will not work.
Footnotes can be included with the following syntax.
This is a claim that requires supporting information.[^info]

[^info]: Supporting info...
The footnote itself can appear anywhere within the document, but it's most convenient to keep it close to the referenced text in your markdown document. The identifiers in footnote references may not contain spaces, tabs, or newlines.
Code blocks begin with a row of three or more tildes (~) or backticks (`) and end with a row of tildes or backticks that must be at least as long as the starting row.
```
if(val == 42){
  alert('the answer!');
}
```
You can also attach attributes to a code block to get syntax highlighting and line numbering.
~~~ {#mycode .ruby .numberLines startFrom="100"}
require 'open-uri'
data = open('http://www.octolabs.com/').read
~~~
To get a custom title page for the whole document you can use a YAML
block to set a title_image attribute.
---
title: A simple document
author: Jeremy Green
title_image: http://example.com/image.jpg
---
For best results the aspect ratio of the image should be 8.5x11.
You can import other PDFs into your document with the \importPdf
command.
\importPdf{http://example.com/something.pdf}{white}
The first set of curly braces is required and contains the URL of the pdf.
The second set of curly braces is required, but you can leave it blank. It sets the background color of the page in case the pdf doesn't fill the page.
For best results the pdf pages should be 8.5x11 inches.
You can import an image as a full page by using the
\fullPageImage command.
\fullPageImage{http://example.com/image.jpg}{black}
The first set of curly braces is required and contains the URL of the image. Formats can be png or jpg.
The second set of curly braces is required, but you can leave it blank. It sets the background color of the page in case the image doesn't fill the page.
For best results the aspect ratio of the image should be 8.5x11.
Remarq uses Pandoc flavored markdown, so you can check that documentation for more in depth info.